Unsung Heroes of Forums

Here’s to those who provide closure

I don’t even need to ask if you’ve been there, I know you have, we all have. So, let’s take a moment and give thanks to those amazing human beings that, even though they solved their own issue, took the time to provide the solution and especially those who can explain how they arrived there! We solute you: the Heroes of Forums!

Our Complete Network Overhaul

We had been having issues with our network: some spotty WiFi, laggy connections, etc. When the ethernet cable that runs from the server rack, around the basement, through the office ceiling, around the living room baseboard to the 8-port switch under our television – providing the oh-so-necessary bandwidth for 150Mbps of uncompressed mindblowing video and 7.2 Atmos surround sound – had an embolism. Yes, the ethernet cord just croaked. We tested the wall jacks, replaced them, tested the terminal ends, tried new last-mile cables… the cable tester showed a short between pins 1 and 2, confirmed with the multimeter. This is not a cable you can replace with a fish tape – disappearing into finished ceilings, running through walls. Let’s just say, we were pretty pissed.

We had new network gear sitting around for about a month now, procrastinating the installation as we knew it was going to be frustration, or at minimum a full day’s undertaking. With the network issues and our most precious of Cat6 runs dead, there really wasn’t much excuse not to. So, yesterday, we yanked the EdgeSwitch 48, EdgeSwitch 16 POE, the pFSense box, the who-knows-how-old dell connect switch, and similarly aged Linksys switch and racked up our new UniFi Switch 48, UniFi Switch 24, UniFi Switch 8 POEs, and the neat (in theory) UniFi Dream Machine Pro. While my partner was running the new Cat6 cables in the cabinet, I set to running 1/2″ raceway from the server rack out to the living room on the ceiling so we can get our 4K fix – when I hear cursing from the basement.

Turns out one of our storage nodes decided to report degraded disks. I’m not 100% sure on what the issue is or how he resolved it – I know very little of CephFS and didn’t want to distract from his repair work. So I cleaned up a bit around the house until the issue was resolved… but wouldn’t you know it – yeah, yesterday was a game of whack-a-mole-tech-problems – now that the storage array was back online, none of the machines could mount the volumes. Exhausted, pissed, frustrated, and pretty much falling asleep – he decides to give up for the night and wants to watch a movie. After mixing up some delicious Moscow Mules, he passes out 4 minutes into the movie but I’m wide awake.

Enter Teagan, P.I.

There were a million possible causes for the volumes failing to mount. My first hunch was the firewall, though before he gave up my partner listed numerous networking services (that I’d never heard of before) that the UniFi Dream Machine might be blocking. Our storage array consists of 4 nodes, 3 of which are fairly new, 12 bay, 16 core beasts but the other one, the same one that reported errors earlier, is a tiny little 1U box that is attached via SAS to a dumb disk shelf (CEPH01) – in fact, it only has 2Gbps ethernet while the others have 4 Gbps. Knowing this is important to understanding the first hypothesis: journalctl reported connecting to CEPH02 but losing connection and attempting CEPH01 followed by the connection timing out completely. Seems reasonable to assume CEPH01 was causing the timeout. So, I did the cabling, redid the LAGG assignments on the switches, reset the router – nothing.

Ok, so having little knowledge of CephFS – I needed to know what might be causing timeouts when mounting the remote volumes. To the Google! Here’s the thing though: the UniFi Dream Machine is fairly new, CephFS is a little niche, and combining the two? Forget it! From around 5am to almost 9am I searched for something, anything! Sure I got a few hits that seemed possible – but ended up going down rabbit holes. Then, at 8:48am (had to check my browser history), I stumble onto this post:

https://forum.proxmox.com/threads/laggy-ceph-status-and-got-timeout-in-proxmox-gui.50118

ftrojahn‘s description sounded nearly identical – except his stack is different; ProxMox not too long ago added native CephFS support to their software – if you want some experience with a decent piece of virtualization software and enterprise-level storage solution I would definitely recommend you check it out. ftrojahn not only explained the setup, issues, and attempts to diagnose the cause very well, did what few out there dare (care):

The Heroes We Need, and Deserve

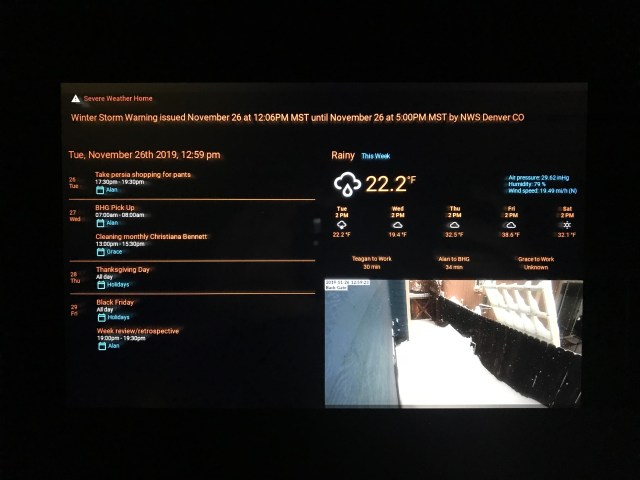
It was an issue with mismatched MTU size! Do you know why this never crossed my mind? Because of this little toggle right here on the UDMPRO’s web interface:

Forum Heroes Light the Path - Mismatched Jumbo Frames caused by a toggle switch
Jumbo Frames traditionally set MTU to 9000

First, why do we care about MTU size – the default for most systems is 1500. By increasing the size of the frames, we reduce the number of packets being sent over the wire, as well as drastically reducing the ridiculous amounts of handshakes that happen between transmit and receive (if you are unfamiliar, here’s a link describing TCP handshakes). This is especially beneficial when you have terabytes of data flying around your network 24/7 like we do.

Yes, the Y-Axis has units of GB (Yes, Gigabytes!)

Ok, so Jumbo Frames are enabled, which should be 9000 – every host on our network has the MTU set to 9000 by default. Why is there still this timeout issue?

Well, I had luckily glanced at this post many hours earlier – notice the last comment, here’s the key piece:

Unfortunately, on newer Gen 2 devices, Jumbo Frames appear to be only 8184 bytes

https://community.ui.com/questions/When-you-enable-jumbo-frames-on-UDM-Pro-what-MTU-value-is-it-setting/04ceb4ec-aa5f-434d-abb3-2a14f3f6e1ed

Now, this little tidbit seems to be missing from any of the documentation I could find, so phastier you are a hero, we deserve more heroes in forums! The final challenge came down to the question: what the fuck do I do now? I love my partner, he has taught me so much about Linux, networking, DevOps – I wanted to show him all that knowledge has not gone to waste.

Making the UDMPRO My Bitch

It was time to learn what the hell MTUs really were and if any of the options on the web interface could help me. I found one: MSS Clamping – this sets the maximum segment size for TCP packets, maybe? HAHAHA NOPE! MSS tops out at 1452 – a little shy of the necessary 9000 (minus headers). Ok… time to get my hands dirty. The web interface isn’t the only way to configure this hunk of metal; in the past, my partner has made changes via SSH that are not available via the user interface. Since this device is a router and then some, I found it had 45 network interfaces – VLANs, bridges, loops, etc. While setting the MTU I found setting the MTU for the network interface is actually fairly easy: ip link set mtu 4096 dev eth0 I wasn’t about to run that command 45 times. Thankfully, /sys/class/net has an easily parsable list of the interface names.

ls -1 /sys/class/net | while read line ; do ip link set mtu 9000 dev $line ; done

With that one line, there was peace in the world… Ok not really but I was so proud of finding this solution I just had to wake him up to share the good news…

Configuring a Raspberry Pi 3b+ as a Kiosk Display

Hindsight: I should have documented this better the first time…

When we built our magic mirror, I remember thinking: “I really should document this” but I didn’t. Today, the micro-SD card that was running the Magic Mirror died, it wouldn’t boot, we couldn’t mount it, nothing. I couldn’t even find the blog posts that I had followed when we built it originally. Hanging my head in shame all I could think of was “I fucking knew this was gonna happen”. So, learn from me, make sure you document your projects, you never know when you might need to rebuild.

Supplies

  • Raspberry Pi (version depends on your needs)
  • A display with HDMI input
  • Micro-SD card reader (for installing OS on the RPi)

Decide now: Chromium or Iceweasel?

Depending on your choice of browser, that will dictate which version of the operating system you’ll use. The current version of Rhaspian (Buster), does not support Chromium but the previous version (Stretch) does.

Chromium has an execute flag --app that will hide the address bar and border and easily provide you a full-screen experience. Iceweasel on the other hand, is a little more involved. Chromium is not currently supported in Rhaspian Buster (Debian 10), though you might be able to find some workarounds. We spent a few hours trying to image some micro-SD cards with Rhaspbian Stretch but kept running into issues with the filesystem: some would fail verification, some would have the root console locked. I decided that I just didn’t care enough to dig deeper; I went with the Raspberry Pi Imager and burned Buster to a spare micro-SD card and read up on how to use Iceweasel.

Regardless of your path, something I learned in the last few months, you can set up SSH and WPA supplicant before you even insert the card into the pi. Simply mount the boot volume of the micro-SD card on your system and run:

touch ssh

An empty file named ssh is all that is needed to enable SSH on your Raspberry Pi right from the gate! No need to dig around the basement for an old monitor and keyboard to configure, it’s remotely accessible. Speaking of remote access, write a file to the boot volume named wpa_supplicant.conf with content:

country=US # Your 2-digit country code
ctrl_interface=DIR=/var/run/wpa_supplicant GROUP=netdev
network={
    ssid="YOUR_NETWORK_NAME"
    psk="YOUR_PASSWORD"
    key_mgmt=WPA-PSK
}

Replace YOUR_NETWORK_NAME with your SSID and YOUR_PASSWORD with the WiFi password for that network. Once your Raspberry Pi boots, it will automatically connect to your WiFi network and have SSH access with user pi and password raspberry. Now it’s time to configure it for your kiosk display.

First, get the preferred resolution and display modw using the tvservice command:

tvservice -d /tmp/edid_info
edidparser /tmp/edid_info | grep 'preferred mode'

This will provide you with the preferred display settings for the display connected to your Raspberry Pi. Take this information and edit /boot/config.txt:

# Always force HDMI display over DVI
hdmi_group=2
# HDMI mode as reported by the display
hdmi_mode=16

The X-Server

It’s highly recommended you create a new user for running the display as root or pi have too broad an attack vector, make sure you provide the user with a sufficiently complex password and a home directory, as it will be used by the browsers to store profile information.

adduser kiosk

Now you need access to the graphics cards, input devices, and displays in order to run your choice of browser: the X server. Install the appropriate X server for your system, along with the xinit helper package:

apt update
apt install -y xorg xinit xserver-xorg-legacy

Modify the /etc/X11/Xwrapper.config which facilitates launching the X server with or without a user with sudo privileges:

# Xwrapper.config (Debian X Window System server wrapper configuration file)
#
# This file was generated by the post-installation script of the
# xserver-xorg-legacy package using values from the debconf database.
#
# See the Xwrapper.config(5) manual page for more information.
#
# This file is automatically updated on upgrades of the xserver-xorg-legacy
# package *only* if it has not been modified since the last upgrade of that
# package.
#
# If you have edited this file but would like it to be automatically updated
# again, run the following command as root:
#   dpkg-reconfigure xserver-xorg-legacy
needs_root_rights=yes
allowed_users=anybody

As we are building a kiosk display, we want the X server to start up without power management to prevent it from sleeping. Create a file, .xserverrc, with execute permissions in your kiosk user’s home directory:


#!/bin/sh
# Disable power management on a new X server process to prevent the display from sleeping along with ignoring tcp-based connections to it

exec /usr/bin/X -s 0 -dpms -nolisten tcp "$@"

Iceweasel Setup

Install the official iceweasel package:

apt install -y iceweasel

We will want the browser to always launch full-screen, so modify the width and height values to the values associated with the preferred display mode above and write to /home/kiosk/.mozilla/firefox/XXXXX.default-esr/xulstore.json:

{
    "chrome://browser/content/browser.xul": {
        "navigator-toolbox": {
            "iconsize": "small"
        },
        "main-window": {
            "width": "1080",
            "height": "1900",
            "screenX": "0",
            "screenY": "0",
            "sizemode": "fullscreen"
        }
    }
}

To make the browser consume all of the screen real-estate, modify the browser’s CSS /home/kiosk/.mozilla/firefox/XXXXX.default-esr/chrome/userChrome.css – create the path and file if either does not exist:


@namespace url("http://www.mozilla.org/keymaster/gatekeeper/there.is.only.xul");


#content browser {
margin-right: -18px !important;
overflow-y: scroll;
overflow-x: hidden;
}


#content browser {
margin-bottom: -18px !important;
overflow-y: scroll;
overflow-x: hidden;
}


#content browser {
margin-left: -2px !important;
}

#content browser {
margin-top: -5px !important;
}

When the X server starts up, it will look to execute the .xsession located in the user’s home directory. This is where you will launch the browser and load the appropriate URL for your needs:

#!/bin/sh
exec /usr/bin/iceweasel --profile /home/kiosk/.mozilla/firefox/XXXXX.default-esr https://www.your.domain

Create your your_kiosk.service file in /etc/systemd/system/ and enable it via systemctl enable your_kiosk.service so that it is invoked on system startup:

[Unit]
Description=Kiosk Display
After=network-online.target
Before=multi-user.target
DefaultDependencies=no

[Service]
User=kiosk
ExecStart=/usr/bin/startx -- /usr/lib/xorg/Xorg.wrap -nocursor
Restart=always
RestartSec=10

[Install]
WantedBy=multi-user.target

And finally…

Make an image of your rhaspian system so you don’t have to do this again!

Raspberry Pi

In the beginning, a virtual assistant was created…

The glue between speech recognition and auditory reponses

Everyone knows of Amazon Echo and Google Home, there are even a few open-source virtual assistants like Mycroft and Snips.ai. In my opinion, these all suffer from the same deficiency: they aren’t very smart.

I want to be able to talk to my house, and by talk, I mean actually talk. Sure there are a lot of skills or plug-ins made for these platforms, but I haven’t really been impressed by any of them enough to want to use them as my primary voice interaction with my house. You can hook them into Home-Assistant and Mycroft falls back to Wolfram Alpha for any unknown user intents; but can you really talk to them? If you ask Alexa “How are you doing?” do you get some predefined response or does it look at your home and network and respond with the status? No, it doesn’t.

Most people know I hate the cloud; putting your work on “someone else’s machine” is asking for privacy violations, platform shut down and other issues. All of my projects are local first. So right away Amazon Echo, Google Home, and even Siri are off the table. Mycroft and Snips are privacy by design, but if you look at the skills available for each, it’s appalling. For example, Snips has around 8 different integrations with Home-Assistant and almost every one of them is limited to lights, switches and maybe one or two other domains – this applies similarly to Mycroft.

I recently installed a machine-learning centric server in our rack with two CUDA enabled GPUs specifically for facilitating training and inference of machine learning models. Thus, it is only fitting that the platform for my assistant is a learning one. Enter Rasa, a machine learning chatbot. It is definitely a time sink, but it does exactly what I want. No regex patterns for determining user intent (looking at you Mycroft!), the ability to execute remote code for certain intents and allows you to enter multiple response templates for any intent so it doesn’t feel as robotic.

Natural Language Understanding

With Rasa, you define actions and intents, combining them with stories. Intents are exactly what you would expect: what the user wants the assistant to do. For example, you might have an intent named greet which returns the text “Hello, how are you today?”. Your stories can fork the logic based on the user’s response. “I’m doing terrible today” could yield the bot sending cute animal pictures from an API that returns random cat pictures to try to cheer you up. You get to design the flow of dialog how you see fit.

How does Rasa determine the user’s intent? Through training. You provide it with as many sample inputs as you can and associate them with the appropriate intent. As you use your bot, your inputs are logged and can be later annotated – annotating when it comes to machine learning is telling the bot whether it inferred the correct intent from the input or not. This right here is the time sink, it takes a lot of time to come up with sentences that a user might input for every intent you define.

Stories

We use SABNZBD to download much of our media and some times I’d like to know if my downloads are done. Before Rasa, I would have to navigate to the SABNZBD web front end to check the queue. With Rasa, I can ask it “are my downloads done?” and it will query the SABNZBD API to see if the queue is empty or not and report back! If you’re bored, you can set up intents and responses to play a game – like guess a number. The possibilities are endless!

For most intents, there’s one action – but some intents can trigger an entire tree of actions and follow up intents. For example, if the bot asks the user how they are doing, depending on the response the bot will respond differently.

## greet
* greet
  - utter_greet
> check_mood

## user in good mood
> check_mood
* mood_great
  - utter_happy

## user not in good mood
> check_mood
* mood_unhappy
  - utter_cheer_up
  - utter_did_that_help
> check_better

In the example above, when the user says “Hello” or “Hi” the bot greets them and asks how they are. If the user responds with “Good”, “Awesome”, etc. then the bot responds with a positive message like “That’s awesome, ist here anything I can do for you?”. However, if the user says “Terrible” or “Awful”, the bot will try to cheer the user up – in my case, cute animal pictures or funny jokes. If the user is still not cheered up, then it will randomly respond with something else to try to cheer the user up until they are happy.

Communicating With the House

In addition to the built-in actions, you can build custom actions. By default, these custom actions are in the configuration directory inside actions.py. If you plan on making custom actions, definitely spin up a custom action server because when you make a change to a custom action the Rasa service needs to be restarted with every change – with a custom action server, changes only require restarting the custom action server.

The easiest way to spin up a custom action server is via their docker image. You’ll tell Rasa to talk to the custom action server by editing the appropriate line in the config.yaml in the project directory. Once spun up, you can implement actions to your heart’s content. Be warned, Rasa only loads Action subclasses defined in the actions.py file – to work around this, I place the logic for the action in their own python file in separate packages and define the class itself inside actions.py. For example:

# actions.py
# NOTE: package must start with actions or it can't locate the eddie_actions package

from actions.eddie_actions.location import who_is_home, locate_person


class ActionLocatePerson(Action):
    def name(self) -> Text:
        return "action_locate_person"

    def run(self,
            dispatcher: CollectingDispatcher,
            tracker: Tracker,
            domain: Dict[Text, Any]) -> List[Dict[Text, Any]]:
        return locate_person(dispatcher,
                             tracker,
                             domain)
# eddie_actions/location.py
def locate_person(dispatcher: CollectingDispatcher,
                  tracker: Tracker,
                  domain: Dict[Text, Any]) -> List[Dict[Text, Any]]:
    person = next(tracker.get_latest_entity_values(PERSON_SLOT), None)

    response = requests.get(
        f"https://automation.prettybaked.com/api/states/person.{str(person).lower()}",
        headers={
            "Authorization": f"Bearer {HOME_ASSISTANT_TOKEN}"
        }
    )

    location = None

    try:
        response.raise_for_status()
        location = response.json().get('state', None)
    except requests.HTTPError as err:
        _LOGGER.error(str(err))

    if not location:
        dispatcher.utter_message(template="utter_locate_failed")
    elif location == "not_home":
        dispatcher.utter_message(template="utter_locate_success_away")
    else:
        dispatcher.utter_message(template="utter_locate_success", location=location)

    return []

I created a long-lived token for Rasa inside Home-Assistant and pass it to the container via an environment variable. I created similar actions for connecting to Tautalli (Plex metrics) for recently added media, SABNZBD (UseNet download client) for asking about download status and plan to connect it to pFSense and Unifi for network status – “Hey Eddie, how are you today?” “Not so good, network traffic is awfully high right now.”

Chitchat and Other Fun

With the goal of being able to actually talk to your assistant, general chitchat is a must. Generally, when you meet someone there are some pretty common patterns in the conversations: introductions, hobbies, jokes, etc. With Rasa’s slots, introductions are fairly easy to implement. Create an introduction intent and add some examples: “Hi there, I’m Teagan” (where Teagan is annotated as the bot respondent’s name, reply with the bot’s name and continue from there. Eddie, my assistant, definitely has some hobbies:

Every virtual assistant out there has some fun easter eggs. Any child of the 80’s/90’s who played games knows some of the iconic cheat codes. Eddie is not a fan of cheating:

Eddie is modeled after the Heart of Gold’s onboard computer. So, of course, it has to have specific knowledge:

Thoughts and Next Steps

Truthfully, it can be very tedious to train your assistant yourself. I highly recommend deploying an instance and sharing it with friends and family. You’ll see the conversations they have had, be able to annotate the user’s intents (or add new ones), fix the actions and responses, and training a better model.

Of course, Rasa is text-based by default. Once I am happy with the defined intents, stories, responses and flow of dialog it will need to be integrated with Speech-to-Text (currently looking at Deepspeech) and Text-to-Speech (espeak, MaryTTS or even Mozilla TTS). Keep an eye out for a post about integrating these services with Rasa for a true voice assistant that continually learns!

The Magic Mirror

Disregard that this post is around 4 months after the build…

We had just had our bathrooms remodeled and were looking at a medicine cabinet for the upstairs bathroom. Alan and I had both been wanting to build a magic mirror but never had the motivation or a fixture that would work.

We spent weeks trying to find a medicine cabinet we liked and would go with the vanity/countertop and then we saw this one.

The color and style matched the rest of the bathroom and the second shelf was the perfect height for allowing the necessary cables and hardware. Only losing one 5 inch section of the middle shelf seemed a small price to pay to design and build something we’ve been talking about for years.

The Parts

The Plan

When the medicine cabinet arrived, we evaluated our options to determine which side the monitor would go on, would we reuse the wood backing of the mirror section, how will we deliver power, etc.

We decided the right-hand mirror was a good place to mount the monitor. It was closer to the power outlets, wasn’t too in the way and would be visible to anyone using the sinks. As carefully as we could, we removed the mirror and its wood backing from the medicine cabinet. The answer to “would we reuse the wood backing of the mirror section” was answered for us, as the mirror was glued too well to the mirror and attempting to remove the mirror shattered it.

Alan grew up working in his Dad’s framing shop and is quite skilled at it, in both the technical aspect (mat cutter, frame nailer) but also the subjective aspect (mat color schemes, layers, etc). This is why we have a 5-foot mat cutter on hand and some black foam board, which was sturdy enough to use as a backing and dark enough to allow as much light to be reflected off the mirror as possible.

The Build

Once the acrylic arrived, Alan cut the black foam backing to the size of the wood backing originally attached to the mirror and an exactly sized window where the monitor would be able to sit flush against the mirror. Using ATG tape along the edges to hold both the acrylic and the foam board, it seemed like we were good to go. The monitor was such a tight fit in the window, that we didn’t even bother taping it in for extra support.

We needed to install some outlets inside the medicine cabinet. While we were waiting for the parts and motivation, we realized there were a couple large scratches on the acrylic sheet! That’s what we get for trying to save $30 by getting acrylic instead of glass. So, we took the acrylic, the monitor and the backing down and placed an order for Smart Mirror Glass and waited.

Build #2

Once the glass arrived, we realized that the reflection off of the acrylic was a little distorted compared to the glass – I guess the acrylic just had some surface imperfections. Note: there is a slight blue tone to it compared to the other mirrors, but it is hardly noticeable.

Before mounting the new glass and Pi to the medicine cabinet, I thought it would be a good idea to cut and insert a 2-gang outlet box in the back of the medicine cabinet. We had a couple 2 AC/2 USB outlets laying around, which would server perfectly for charging razors, toothbrushes and running the Magic Mirror. Unfortunately, there was no way to get the Romex (standard in-wall 2/2 or 3/2 electrical wire) to the available outlet without going up into the attic where there’s barely room to move around and itchy fiberglass – not to mention Scooby-Doo has taught me there’s probably Old Man Jenkins up there disguised as a ghoul. So, I ran it as high as I could through the vanity to the wall with the outlet and fished it up and out.

Repeating our previous steps, we attached the Smart Mirror glass and foam board to the door frame using ATG tape and forced the monitor into its little window. Since the monitor had been inserted and removed, it didn’t quite have the same snug fit – for added support we used a rubber cement that wouldn’t eat through the foam board to secure the monitor in place. Our monitor had mounts for a Raspberry Pi as well as a USB power source for it – which means if you turn off the monitor, it will turn off the Pi and Visa-Versa.

Software

We imaged the Raspberry Pi with Raspbian Stretch (primarily due to the fact that I had the image already on my machine). Once we set the OS up appropriately on the Pi, connected to WiFi and set up SSH remote access, we mounted it on the monitor in the medicine cabinet and closed the door.

We built a panel specifically for the MagicMirror in Home-Assistant, which removes the tabs/sidebar and other extraneous information with a dark theme set. To access that panel, we needed to install Xorg which gives rise to a graphical user interface, since up until now the system was headless. We used the chromium-browser package because it is simple to use and allows you to open a URL as an app (removing address bar, border, etc.).

We made a special user to run the interface, keeping user roles and purpose separate, aptly named mirror. In the home folder for mirror we created .xsession (this file defines what happens when the X server starts).

#!/bin/sh

#Turn off Power saver and Screen Blanking
xset s off -dpms

#Execute window manager for full screen
exec matchbox-window-manager  -use_titlebar no &

#Execute Browser with options
chromium-browser --disk-cache-dir=/dev/null --disk-cache-size=1 -app=http://$HA_URL:$HA_PORT/lovelace/mirror?kiosk

To make sure this all happens automatically, create a systemd script, we chose to place our’s /etc/systemd/system/information-display.service:

[Unit]
Description=Xserver and Chromium
After=network-online.target nodm.service
Requires=network-online.target nodm.service
Before=multi-user.target
DefaultDependencies=no

[Service]
User=mirror
# Yes, I want to delete the profile so that a new one gets created every time the service starts.
ExecStart=/usr/bin/startx -- -nocursor
Restart=always
RestartSec=10

[Install]
WantedBy=multi-user.target

Don’t forget to enable your service with systemctl enable information-display.service and start it systemctl start information-display.service

Coming Soon

Adding voice control to the mirror, i.e. “Where is Alan” or “Activate Night Mode”